
Aren't the best tree ornaments always the homemade ones?
It's the ones your kids made at school out of popsicle sticks or the ornaments you made yourself that end up having the greatest meaning and hold the best holiday memories.
This year I found some wooden ornaments at the craft store and inspiration struck! Here is what I created:

My first ornament makes use of old chandelier crystals.

Step 1: Start with a wooden ornament. (I happened to find these wooden ornaments at Michaels craft store.)
Step 2: Paint it white using craft paint or any left over white latex paint you have on hand. (Note: I removed the rough twine hanger the ornament was purchased with to make the painting process easier. I attached a new ornament hanger as a final step in the process.)

Step 3: Paint the edges of the snowflake turquoise. Don't worry of you get some turquoise on the white part of your snowflakes while painting the edge. This is actually part of the look you are going for.
You can always do a little touch up with a second application of white paint if you are unhappy with any section of the snowflake.

Step 4: Finish with a top coat of transparent glitter paint to add a bit of sparkle to your snowflake.
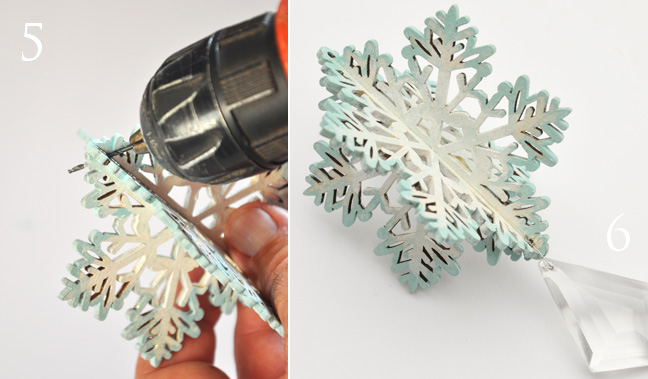

Step 5: Using a fine drill bit, drill a hole on an angle into the bottom of your snowflake. It is important to work slowly and carefully as the wooden snowflake is delicate.
Step 6: Insert a piece of fine string, fishing line or fine wire into your freshly drilled hole to tie on your crystal. We used a loop of fine wire, which we twisted closed. (Tip: If you don't have a chandelier crystal, search for a similar type crystal in the jewellery section of your local craft store.)
Step 7: Add a Christmas ornament hanger to the top.

Hang your handmade ornament and enjoy that sparkle that only crystals can add to your tree!
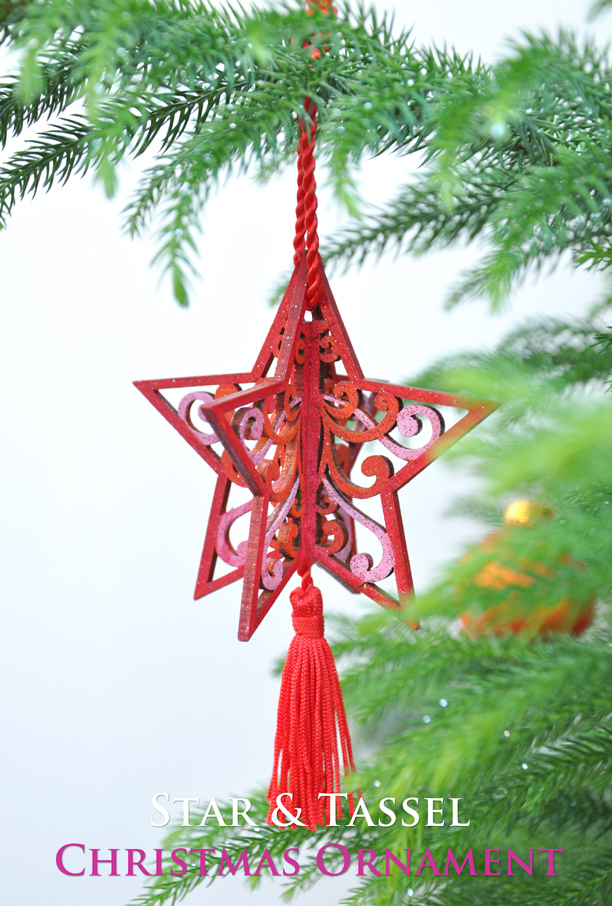
I also created a star ornament using a small tassel.

To make the Star:
Step1: I removed the rough twine hanger the ornament was purchased with to make the painting process easier.
Paint the wooden star colors of your choosing. I used three non-traditional colors: pink, orange and red. Add a top coat of transparent glitter paint.

Step 2: I found this cord and tassel at the Dollar Store. I cut the cord down to a suitable length for the bottom of my ornament.

I put a dab of hot glue at the bottom of my star and used the glue to attach the tassel. (Tip: Hold the tassel in place for a few seconds to allow the glue to set.)
Then I cut a length of the red cord and used it to hang my ornament.


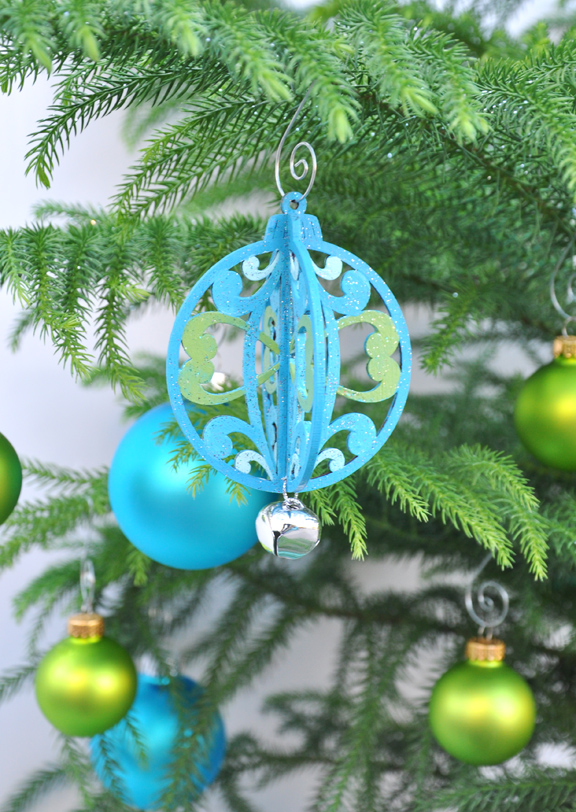
One final variation on these wooden ornaments.
This time, I wanted to add the potential for a pleasant jingle.

To make the Ball:
Step1: Paint the wooden Christmas ball colors of your choosing. I used a mix of blues and green. Add a top coat of transparent glitter paint.
Step 3: Using a fine drill bit, drill a hole on an angle into the bottom of your Christmas ball. Work slowly and carefully as the wooden ball is delicate.

Step 3: Using a piece of fine string, fishing line or fine wire to attach a silver jingle bell to your ornament. For my Christmas ball, I used a fine silver string. I looped it through the hole and tied a reef knot to secure my bell.
Step 4: Attach a Christmas tree ornament hanger to the top of the finished ball.
Happy crafting for the holidays!
No comments:
Post a Comment